The Long Awaited Desk Redo!
Wednesday, January 13, 2016
Hey guys!
Oh my goodness, this desk.
THE. DESK.
THE. DESK.
For the last ten days this desk and I have been through some things, let me tell ya.
The first time I spotted this desk, which is actually an antique sewing table formerly belonging to my father in law, it was in my in law's basement under a mountain of totes in their storage. This was before my husband and I were even married, and I knew it needed to be rescued.
Fast forward to my husband and I getting married and moving within the same month, no wait, I'm lying - the same WEEK. (Because I'm clearly a glutton for punishment.) I knew right away when we found this place that that little sewing table belonged smack dab in the center of my work area, so I made the mad dash to save it from it's cobweb covered life.
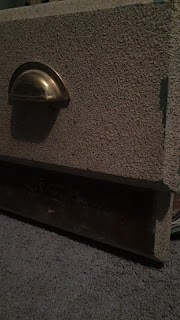
I have this thing where I say "it just needs a little love" about all damaged things. If I had a dollar for every run down, abandoned, decrepit house I've driven past and said aloud to my husband "it just needs a little love" I would have enough money to BUY one of the abandoned, decrepit houses and give it all the love it could ever want or need. When I got the desk to end all desks it was in rough shape, but for the past year and change I've made do with it's bumpy textured surface (done with a sprayable "rock texture" paint by my in laws many moons ago) and not-so-pretty cup style drawer pulls. My sewing machine is too big to fit in the dedicated sewing machine spot inside of the desk, so it lived on top and the surface was less work space and more catch-all with drawers.
I have this thing where I say "it just needs a little love" about all damaged things. If I had a dollar for every run down, abandoned, decrepit house I've driven past and said aloud to my husband "it just needs a little love" I would have enough money to BUY one of the abandoned, decrepit houses and give it all the love it could ever want or need. When I got the desk to end all desks it was in rough shape, but for the past year and change I've made do with it's bumpy textured surface (done with a sprayable "rock texture" paint by my in laws many moons ago) and not-so-pretty cup style drawer pulls. My sewing machine is too big to fit in the dedicated sewing machine spot inside of the desk, so it lived on top and the surface was less work space and more catch-all with drawers.
Finally after Christmas, after reviewing my goals post again, I couldn't take it anymore and brandished a home depot gift card that I've had since our wedding shower from the depths of my wallet, looked to my husband and declared "The desk is getting a makeover."
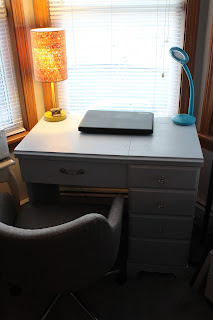
We headed off to Home Depot on New Years Day to look at paint colors and establish the things I would need. I've never, ever redone a piece of furniture before so I was truly flying by the seat of my pants with only information from the internet and knowledge from tinkering around with other projects clanging around in my head. Thanks to my awesome dad, I had sandpaper, scraping tools, eye & face protection as well as access to a bunch of other tools should I need them, so that saved me a ton of money and time! I picked out a beautiful blueish grey paint from Behr in a shade called English
Hollyhock. (It's absolutely stunning in person, though my camera
captures it only as grey - so pardon that.) I wanted something soft that
wouldn't stand out in my work space, in a nice calm colorway to keep my
area peaceful.
The day of the second, I spent ALL DAY while my husband was at work scraping the desk down. Mind you, it's January. In New England. So I did all of this in my apartment. (Hello to my beautiful landlady, if you're reading this I PROMISE I kept the mess contained!) I spread an old tablecloth out on the floor, plopped the desk on top of it and got to work while listening to Nicki Minaj on my nifty bluetooth headphones I got for Christmas. It was an excellent work out, I'll tell you that much! It took me 40 minutes to scrape down ONE side panel by itself!
After the bulk of the desk was scraped down, on the third we went and picked up all of the supplies I needed! The paint I got was the Behr paint and primer in a semi-gloss, in the sample size. I used one and a quarter sample sized pots (8 oz per pot) to do this project. I honestly could have gotten away with just the one pot, but I used a little splash of the second to cover any missed areas and to double coat the drawers. Better to be safe than sorry! I also grabbed a mini foam roller with some replacement rollers just in case, a second scraper with a more narrow edge to get into the crevices of the drawers I had yet to scrape, a small paint tray, tack cloth, two sanding blocks with angled sides in two different (high and low) grits, wood filler, and a handle for the fake drawer on the front of the desk. As far as the four functioning drawers on the sides go, my dad (luckily!) had four vintage crystal knobs tucked away in his various bits and bobs. He's had them since before I was even born! He never had a purpose for them and they were the perfect fit for the aesthetic I was going for so he gifted them to me! He's the best, that one! The old hardware for the knobs was rusted and gross from age, so I had to get screws to fit, washers, and nuts for the back to keep them in place. (It was easier said than done. The knobs are long, the drawers are thick and the screws had to go completely through the knob and then through the drawer - it was a peculiar size, I got talked down to by some dude while looking, but it got done after all.) I soaked the knobs sans hardware in a dish soap/white vinegar/baking soda mix and scrubbed them with a soft bristle toothbrush I had kicking around to get any and all gunk off of them from sitting in my dads workshop for years upon years and they cleaned up super nicely! It was another great money saver (comparable knobs at HD were roughly $4 a pop!), and after the $25 gift card I only spent twenty dollars and change to get all of my supplies!

We got home and I put my husband to work sanding and scraping the drawers while I sanded the last bits of paint off of the body of the desk, filled some of the holes from the old pulls with wood filler, and wiped the whole thing down with the tack cloth. All while keeping his sanding/scraping area WAY away from my "clean" area! (And while simultaneously binge watching Making a Murderer. Frustration makes the time pass quicker, after all!)
Once it was all scraped, sanded, filled and wiped down to the best of my ability, I could paint! I was so excited to start, it was definitely the best and easiest part of the whole process. The paint went on like butter and dried SO fast. I did 2 coats on the whole body of the desk and the same one drawer before calling it quits for the night. It was super late by that point! I didn't feel more than two coats was necessary anyway, the coverage of this paint is awesome. By far the best I've used for anything!
I've never used wood filler before, and the holes from the previous hardware were so wide and deep. I did the best I could, but they're still very much visible on the functioning drawers. I, personally, like it that way. I feel like they add character to the desk and remind me of the life it once lived. It shows it was redone by hand and the little dimples in the surface make me smile when I see them. I like things with a story! That's just me!
Once the drawers were painted and dry a few hours later and the crystal knobs were in, I legitimately almost cried! I LOVE sitting here now. It brightened the space so much and it feels great to see the fruits of my labor! My father in law loved its transformation as well, which was so nice to hear since it was originally his, after all.
I feel like this was a huge learning experience, I've already got plans to redo a small table in the spring and I'm excited to apply what I've learned with this desk to that project. That's what I love about DIY!
If you have any advice for my future furniture endeavors, or if you've got a cool remodeled piece of furniture you've done that you'd like to share with me, please feel free to drop it in the comments!
Love,
Fawn.
(Some of the photos in this post were taken on my iPhone. Sorry if the quality is a little off - I didn't want to be juggling my nice camera with messy hands!)


0 comments